Showing posts with label Plastic bucket. Show all posts

Sunday, June 2, 2019

First Weekend of June Planting

I know, I'm about two weeks late on many of the summer plants, but I did get the seeds in the ground today. 

Planted today:

  • Lettuce 3 types, 5 per pot
  • Cucumbers 4 plants, 3 pots (I trellis them between pots)
  • Radishes 1 row
  • Carrots 2 rows (intended to plant 4 short rows but changed layout of garden, see below)
  • Thyme 1 row
  • Basil 1 row
  • Dill 1 row
  • Bush Beans 1 row
There will be a lot of thinning over the next few weeks.  I way over planted everything.

This particular garden bed was a mess of roots and blackberry vines that came up through the bottom of the garden. The snakes were not in this garden under the "weed killing tarp" tilling it up for me. Plus I had to take a spade to get deep into the soil to dig out the stupid wild blackberry vines, and get the weed roots dug/broke up. I "hand tilled" with a shove, pulled out weeds/roots, threw on a thin layer of manure before raking/leveling and planting. I am hopeful that I got the majority of the roots and that they won't "re-root."  

This past month, I had a hard time keeping the tarp in place on this bed because this bed is more exposed to the winds, and the storms kept blowing the tarp back, exposing the edges of the soil to the rain and stuff. It took me the better part of Saturday to get the soil ready to plant. I have a "cage" around this garden bed because, with the bed being out away from the house, the crazy dogs, cats, coyotes and deer like to romp in it. I included a photo (more for my memory of what's where) of the rows of herbs and vegetables that are in this bed.

Remember that before I threw the tarp on that garden bed, I had pulled out a bunch of wintered over onions? Some are struggling to grow. Two, however, have started to flower.  They grew some really thick stalks with one big flower bud at the top of that stalk. I have read that if I allow it to continue until it is dead/dried, that I can shake the seeds from the flower into an envelope and plant them early next spring in the greenhouse. It will drain all the nutrients from the onion in the process. Worth the try, I guess. 

Day Three - Corn

In the other raised "corn" bed, half of the corn have come up. That's a pretty fast start - I planted mostly germinated seeds just three days ago! I counted 20 little sprouts today.  I have my PVC in place in case I need to cover to protect the plants.  The weather temps are supposed to turn cold (low 60s as the highs) later this week. I have the floating row cover all ready to toss over the corn bed for those days to protect the tender growth and keep the ground warmer.

With that, my Micro Garden is on its way.  Finger Crossed!!!! 

I took some more photos today.


Bigger Garden Bed

Corn Sprouts on 6/2/19

Some Sprouts Circled - PVC in place.

Cut Oregano Drying

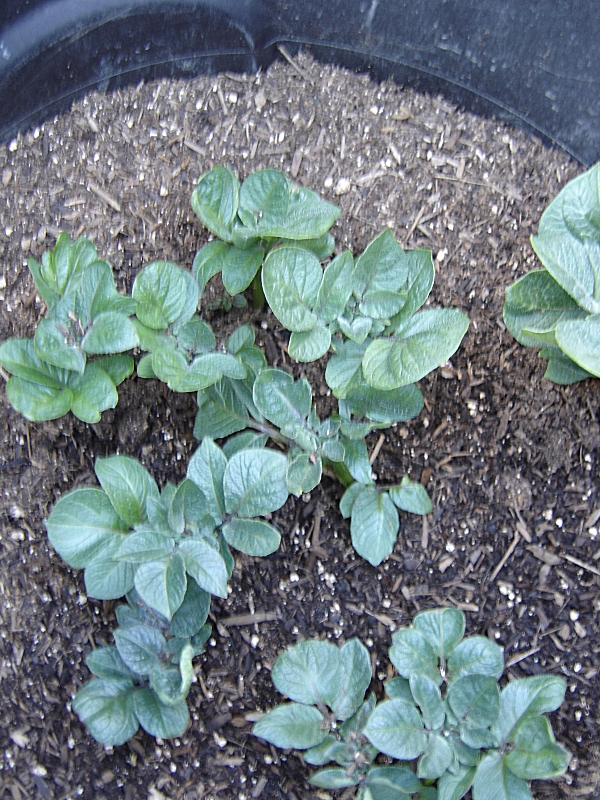
Potato Barrels
Berries Starting to Ripen


Friday, April 22, 2016

Gardening Fun in the Spring

Gardening in the spring is fun and challenging, especially when we have unseasonably hot weather for a week, then back to spring temps for a week or two, then the hot again. Let's see, the updates on the gardens.  We have three raised beds, One bed is mostly garlic and onions with a row of early spinach in there.  The 2nd bed is currently lettuce (variety), spinach, carrots, and dill. The 3rd bed is reserved for the corn. The hothouse has starts in it of parsley, basil, peas, lavender, cucumbers, bell peppers and rosemary.

Then we have several five gallon buckets of peas, blueberries, strawberries, greek oregano and lavender. Plus, we have four 35 gallon black garbage pails with red, blue and gold potatoes. Whee! But the weather is causing some really crazed events, like the thunderstorm with the potential for hail the size of a quarter. So we quickly placed tarps over everything that was out and established. Luckily, we were on the outer edge of the storm with only a small amount of hail and lots of rain and lightening.

Here are some photos of the garden beds and the bucket garden brigade, so far.


corn patch
Will be Corn


Garlic, Spinach & Onions
Onions/Spinach/Garlic


Red Potatoes
Red Potatoes


Blue Potatoes
Blue Potatoes


Hothouse basil
Basil


Red Spinach
Red Spinach


Peas
Peas

Purple Garlic
Purple Garlic


Blueberries
Blueberries

Strawberries
Strawberries


Repotted Lavender
Re-pot of Lavender

Greek Oregano
Oregano

Sunday, May 24, 2015

New Shorter DIY Rainproof Chicken Feeder

Now, with the Welsummers in the smaller pen, we needed a shorter feeder. We found a laundry detergent bucket that was just the right height, so with a few minor modifications to the last rain proof chicken feeder design, we have done it again.  Since this was not a food-grade bucket, I made certain to wipe it all out, then soaked it overnight in a bleach water solution, then wiped it down with apple cider vinegar, just as an added cleaning agent to try to ensure that all the soap/detergent was removed.  One bucket, two 9-inch long 1-inch PVC sliced open, six short sheet metal screws (to attached the PVC channel inside, one piece of plastic corrugated signage board, two L brackets, and six screws and nuts to attach the rim. I made a smaller opening on this one and it seems to be way more balanced without having to add any weight just inside the top of the rim.
Rain-proof Chicken Feeder - Looking down at RimShort Bucket Rain-proof Chicken Feeder Side view

Rain-proof Chicken Feeder - inside adjustment for grain gravity feedRain-proof Chicken Feeder Looking up at rim and inside

Rain-proof Chicken Feeder - looking inside at PVC and plastic boardRain-proof Chicken Feeder - other side view

Rain-proof Chicken Feeder - different angle of sideRain-proof Chicken Feeder - Straight down inside with L brackets


Thursday, December 18, 2014

D-I-Y 5-Gallon Bucket Rain Proof Chicken Feeder with Cover

Here in the Pacific Northwest, we get a LOT of rain. I was not finding any inexpensive hanging chicken feeders with rain covers or any rain proof designs that I wanted to tackle.  I decided to design my own.  I have not seen this exact design any place else online. If I have inadvertently copied someone else, I apologize. I would love to see other patterns to see if there is something that I could have done better,  I know that I have shared photos of the first five gallon feeder that I created.  I have crafted a second with a slightly different feeder layout.  I'm going to try the "bowl" effect with this one to see if it works better.  If it does not work as well, or better, than the last, I can cut it off and add the "red" strip feeder to the base.

DIY 5-gallon chicken feeder rain proof

I will include a lot of photos of the basic design showing the inside along with the steps I took to create it and the materials list. Most of the stuff I pulled from the garage and supplies I already had around the house. If I had to buy the materials, I think it would have cost about $15 total, for a new bucket, lid, brackets, signboard and screws.
  1. Draw lines on the outside "face" to create the opening making sure to do it between the two hanger brackets. Cut out the rectangle as one piece. Precision was not essential, but having fairly straight cuts is helpful. I left a two-inch lip from the bottom of the bucket as the feeder bowl. 
  2. Cut two one-inch diameter PVC pipe at 12-inch lengths. Score & cut the pipes length-wise to create channels for holding the signboard in place.
  3. Mark the inside walls of the bucket where you want the PVC pipes to attach and mark a line on the bottom of the bucket between the two wall lines to give guidance for lining up the angle of the PVC channel before attaching PVC to the inside walls of the bucket.
  4. Drill eight holes (four on each side of the bucket) slightly smaller than the sheet metal screws. Then align the PVC with the channel openings facing towards each other. Carefully mark each PVC to drill matching holes to line up with the holes just drilled on the bucket walls. Screw in the short sheet metal screws through the walls into the PVC pipe. 
  5. Measure the distance between the two attached PVC pipes and then add approximately one-half inch to that for the top portion of the signboard wall section. At approximately an inch from the bottom of the bucket, measure again between the two PVCs and also add an extra one-half inch to that measurement. The wall created with the signboard will look like a trapazoid, approximately one inch wider at the top than at the bottom. Draw and cut a template from the poster board first to ensure that it fits well in the channel before cutting the signboard. 
  6. You may discover that this portion is tricky because the poster board will be difficult to start or slide the board in the channel with the narrower bottom. I removed the three top screws from one of the PVC/wall, leaving the one screw at the bottom, to give enough flexibility to tilt the PVC inward for a slightly easier angle and board fit until the board is completely in place leaving a one inch opening from the bottom of the bucket. I carefully pull the loosened PVC back to the wall and look down the center of the PVC openings to see how the template fits inside. If all looks good, then remove the template to draw the trapazoid shape onto the signboard. 
  7. Using the same technique as above, slide the signboard into the channels. Gently adjust the board inside the pipes until both sides are even in the middle. Then carefully screw the bucket wall back into the PVC pipe. 
  8. For the rain shield, align two corner brackets on the inside of the bucket to attach the cut out wall section as the feeder shelter/cover. Inside the bucket, the rain shield area also serves as a place to put a counter balance weight after the bucket is filled with feed. I attached the rain shield with four machine screws and nuts. 
  9. Washed it all down with a 5% Bleach/95% Water solution to make sure it was all clean and ready for the chickens. Dried it off, filled it with feed, put on the lid and hung it in the middle of the chicken pen so that rodents could not get into it. 
Materials List
  • 1 clean five gallon bucket with lid
  • 1 1" PVC pipe at least two feet long
  • 1 poster board to use as a template for the plastic signboard
  • 1 plastic signboard approx 12" x 12"
  • 8 short sheet metal screws (#12 x 3/8" pan head phillips)
  • 4 machine screws with nuts (#10 x 5/8" round head combo)
  • 2 galvanized corner braces 1-1/2"
  • Large hacksaw or reciprocating saw or other means of cutting the bucket wall in one piece and cut through the PVC. 
  • Drill and drill bits to match screw sizes (I used a non-electric hand drill)
  • Pen that can mark on plastic
  • Phillips Screwdriver
From start to finish, if you have everything available at the start, the feeder takes less than two hours to complete. Having two people to cut out the wall piece and attach the signboard helps a lot! There are a lot of photos below that you can check on how it looks inside and out.  Good luck and have fun.
Inside look of  5-gallon chicken feeder bucket without lid
Inside look of feeder bucket without lid

Fill with Chicken Feed in this section of the feeder bucket

Attached Bucket Wall becomes a Rain Shield

Place Brick on the inside portion of the shield for counter balance when filled with chicken feed.

Five Gallon Bucket Chicken Feeder - front view
Front View

Left side of bucket - angle view
Left angle view

Chicken Feeder Right Angle View
Right Angle View

Bucket with Rain Shield - No Lid Attached
Bucket feeder with Rain Shield - No Lid Attached

DIY 5 Gallon Bucket Chicken Feeder with Rain Shield
Five Gallon Bucket Chicken Feeder with Rain Shield