Friday, July 31, 2015

Hot Summer Daze Pt-2

When I hung the basil outside to dry, the temperature maxed out at 96F in our area.  The basil was not done drying on that first day.  I hung it over our water heater for the night, then brought it back out the next morning for another day of drying (yesterday). The outside temperature hit 101F (for our area - other local temps were a lot hotter). The smaller leaves were dry by 7:30pm but some of the larger leaves were still limp.  I hung them over the water heater for the second night. The one row of larger leaves is back outside for the third day. While the rest of the leaves are pictured in a bowl, below.  You can see that they are ready to be crushed/crumbled.
large basil leaves still drying on day three
large basil leaves still drying on third day

small basil leaves dry and ready to crush
smaller basil leaves ready to be crushed

The hens laid five eggs yesterday in the extreme heat, which is totally unusual! But I'm not gonna complain about it.  I had to keep switching out frozen water bottles with the thawed ones next to their nesting boxes.  In each coop, the girls have a "favorite" box and the other tends to remain unused.  On a rare occasion, they will use the other box, in fact, a couple weeks ago, I found an egg right next to the thawed water bottle! Hahaha. Below are images of the "frozen" water bottles that we put in the boxes and in their pens. Plus, we change out their drinking water a couple of times per day on these super hot days. 


nesting box frozen bottle next to favorite laying box
small frozen water bottle next to fav laying box

Partially thawed frozen bottle in a coop area
large bottle in pen already partially thawed


In early July, we did try to use some makeshift swamp coolers for them, but they were unsettled by the noise and the breeze, so we went back to the frozen bottles. They will lay near it and are more calm about its presence, so that's our technique.

Another first in my limited experience.  Sun Scalded Bell Peppers.  I've grown bell peppers for a few years (all totaled, past and present, about 10 years).  I have never encountered this in our neck of the woods of the PacNW region.  I lost a considerable amount of fruit before it was even fully ripe ;(


Sun Scalded Bell Pepper

Another damaged bell pepper

a lost of damaged bell peppers!

Wednesday, July 29, 2015

Hot Summer Daze

This summer has been especially hot for the PacNW. We have had more 90°+F days already this year than I can ever remember, and it is not even August yet.  Anyways, the chickens are surviving, but certainly not thriving.  Many of them have done a "mini-molt" and we are lucky if we get more than two eggs in a day from the ten layers on these hot days.  And Molting season is coming up soon, so I'm not sure that to think at this point. 

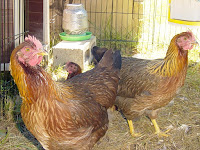
Here are the three new pullets.  Welsummers with their combs and waddles filling in and coloring up. They are definitely noisier than the Russian Orloffs! But their disposition is just as sweet.  They loved the young spinach that I pulled up for them.

Welsummers - 18 weeks   

Welsummer pullets - 18 weeks


The Basil is growing well.  I'm trying my own "solar drying" technique.  Not wanting to have any of it blow away because we almost always have some amount of wind out here, no matter how hot it gets, I put a thread (on a needle of course) through the leaves near the center vein of each leaf then tried to space them out so that there's some air flow.  The first one, I didn't think it through very well. I put the larger heavy leaves on the outer ends of the thread, and being heavy, they want to all slide into the center.  The second one, I pulled the thread more taunt and there's not much sliding going on. Also those leaves are not quite as large. But, we have 90°F already today, with the winds, and the humidity is low enough (32%) helping with the drying process. I'll bring them in at twilight today because the cool down outside at night can contribute to mildew. If they are not quite done tomorrow morning, I'll put them out again to finish up the drying process. Also, I was told not to put them in the direct sunlight because it can bleach out the flavor of the basil. So there you have it. Heck's fire, it's hot enough to even dry up a batch of solar jerky, if I have a mind to! 

Solar Dry my Basil    

Solar Dry my Basil - better string

Sunday, May 24, 2015

Nine week old Welsummers in Temporary Pen/Coop

Hexagon Coop and Rabbit pen.  We made a few modifications to secure the flooring on the coop and found that the door for the coop fits just inside of this long "rabbit run."  Way better than we expected.  We may need to put a little reinforcement round the bottom of the pen to keep it more sturdy and stable, but for now, I think we are okay with how it works.  The plan was to sell off three of the oldest hens, but that's not working out so well.  People want them for free... well, since the hens are currently laying about 18 eggs per week (collectively), I'm not going to just GIVE them away.  So, for now, we will keep them since they are still producing so well.

Anyway, the cage has a metal "stabilizer" bar in the middle, and I know that the pullets will want to roost on it, so I wrapped it with a rope to give them leverage.  I will be finding a pole or something that I can use to hang the feeder on in the corner of the pen to get the food up off the ground and less accessible for the mice. Then we should be fairly "good to go."  heading into the summer months with the pullets.
 
Temporary Pen - Sun and Shade AreasWelsummers at 9 weeks in temporary pen


Pen and Coop togetherTemporary Rabbit Run Pen - tarp to keep the rain off


Large Rabbit Pen/Run for the Pullets

New Shorter DIY Rainproof Chicken Feeder

Now, with the Welsummers in the smaller pen, we needed a shorter feeder. We found a laundry detergent bucket that was just the right height, so with a few minor modifications to the last rain proof chicken feeder design, we have done it again.  Since this was not a food-grade bucket, I made certain to wipe it all out, then soaked it overnight in a bleach water solution, then wiped it down with apple cider vinegar, just as an added cleaning agent to try to ensure that all the soap/detergent was removed.  One bucket, two 9-inch long 1-inch PVC sliced open, six short sheet metal screws (to attached the PVC channel inside, one piece of plastic corrugated signage board, two L brackets, and six screws and nuts to attach the rim. I made a smaller opening on this one and it seems to be way more balanced without having to add any weight just inside the top of the rim.
Rain-proof Chicken Feeder - Looking down at RimShort Bucket Rain-proof Chicken Feeder Side view

Rain-proof Chicken Feeder - inside adjustment for grain gravity feedRain-proof Chicken Feeder Looking up at rim and inside

Rain-proof Chicken Feeder - looking inside at PVC and plastic boardRain-proof Chicken Feeder - other side view

Rain-proof Chicken Feeder - different angle of sideRain-proof Chicken Feeder - Straight down inside with L brackets


Saturday, May 9, 2015

Welsumers Outside in the Spring

With the really warm spring this year, I was able to pop the peeps outside right on time.  Even though we had a few cool (40F) nights, they did well.  Not fully feathered, I decided to place their chick brooder warmer by Brinsea in the coop. They like to sit on it at this point, so it's doing the job for the next few weeks.

Since our three small coops and the free-range pens are still inhabited, I decided to dust off the emergency coop I purchased last year. We had to do a few modifications to ensure that the flooring would not fall out. The angles were rather flimsy and the coop would easily shift when the winds blew. I think we have it stabilized now.

For a protective run, I have the dog pen set up until the other pen shows up. To keep the girls in and the hawks out, I made a dome with arched 10' long PVC pipes that form a cross tied in the middle. I placed bird netting over it, then fastened it to the pen. When it started raining last week, put a tarp over the dome. Also, I hammered stakes on four sides to secure the pen from being knocked over by a critter of any type and it should prevent any critters from crawling under the pen. 

Anyways, the young pullets are now about seven weeks of age and their hackle coloring is showing up in their feathering. Soon, their waddles will begin to appear and their combs will turn red. Then they will be well on their way to joining the rest of our laying flock. :)

Date Weeks Event
03/24/15 0 Chicks Hatched
03/29/15 1 Wings getting coloring
04/11/15 3 Combs started to pop up and black streaks on face are fading
04/17/15 4 Long necks and new Feathers
04/27/15 5 Gold starting to show in hackle/neck feathers
05/04/15 6 Mostly feathered = Outside in Coop
Peek a booh   7 week Welsummer pullets

Welsummer pullet 7 weeks   7 weeks Welsummer pullet - still has a stubby tail

2 seven week Welsummer pullets   Welsummer heading up the ramp

seven week Welsummer looking for bugs   two 7 week Welsummers

three 7 week Welsummer pullets   3 seven week pullets - Welsummers

Here is a great representation of a Welsummer hen on jackiekoerner.com in order to compare the coloring with age.

Welsummer Hen on jackiekoerner.com


Friday, April 17, 2015

Welsummer peeps at 3.5 weeks

I finally have a chance to update on the baby chickens. They are starting into their "long neck" stage, losing their down and getting beautiful tiny wing feathers.  What more can I say. They will be more beautiful and also outside in a few more weeks.
Welsummer pullets 3.5 weeks  Welsumer pullet 3.5 weeks

Welsummer pullet comb 3.5 weeks  welsummer 3.5 weeks feathering

welsummer 3.5 weeks tail feathers

3.5 week Welsummer pullet face comb beak

Friday, March 27, 2015

Here new little chick, chick, chick...

New flock of Welsumer chicks have arrived in our home. Welsumer are not heritage chickens. They are originally from Holland and are fairly new to the US. They also are very docile, similar to the Russian Orloffs. They supposedly winter well, like the Orloffs. Their eggs are a dark brown and larger than the Orloff.  The chicks look very similar to the Orloff chicks, but their wings have more "color" early on.

Instead of using a big box this time, I set up my rabbit cage that I have. I will be adding poster board on the inside to make it a little safer. For now, it is lined with a sheet with a second sheet wrapped around the outside of the cage to keep in the warmth. The brood warmer is ready for the occupants to snuggle under.

rabbit cage for a brooder.

And here's the first occupant.
3 day welsumer occupant

Upside - downside - how does that little one do that?
little chick almost standing on her head
Eating Time
peeking in on a feeding time
More feeding pictures

Picking a spot to eat
Hey, I want that spot
Okay, we're full.