Tuesday, December 22, 2015

Welsummer Layers are Back

Despite the troubling start to merging the one remaining Orloff with the three Welsummers in coop 3, the distress appears to have settled down. The smallest of the Welsummers is regaining her tail feathers and has found a spot on the nightly roost. That Orloff has been literally laying an egg per day for the past week! The Welsummers have been leaving us one to two eggs per day since December 18, so I think we are back to getting a decent number of eggs.  Of the eight layers that we have, we are getting at least three to four eggs per day!  So we are short a couple eggs per day, overall, but that's fine. We still have enough eggs left over to sell off to friends. One Orloff in coop two continues to lay her eggs in the corner of the coop, just outside of the nesting box. :)  

Weather continues to be a sloggy mess, but the winds have been coming in from SW making temps stay above 40F in our area. We may get some snow in a few days.  

Friday, December 11, 2015

10-week Molt in Coopdee Three has Come to an End

The remaining Orloff in Coop three laid her first egg post-molt today. We received four eggs today from both coopers. We actually got three from coop two, which, essentially indicates that all the hens in that coop are back to laying. The Welsummers are still not laying eggs. I'm hoping that now with the lone Orloff in coop three back in laying form, they will pick back up with theirs too. 

We're a soggy mess in our region. Normally, for the month of December, we get about 6 to 7 inches  of precipitation, usually in the form of rain, the entire month. But, in the past week alone, we had approximately 6 inches, with a lot of flooding in some areas. Hillsides are collapsing, roads are getting washed away, new pot-holes are forming, roadways are under feet of water. It's not good. Our ground is saturated beyond the point of draining and our poor chickidees are slogging around in the muck. We threw out some grass hay (not straw) to help minimize the amount of muck, but that's not perfect. It's just the best we can do for now. 

Onions and Garlic might end up rotting in the garden due to the warmth of the air and the amount of rain. Oy Vey! 

Sunday, November 29, 2015

The 12-week Moult is Done

Finally! The Orloff hens in Coop Two have finally started laying eggs again!  They started molting about the 2nd week of September and in the past two days, we have received 2 nice eggs.  Big Sigh of Relief there!  I really think this very hot summer was just too much for them so they molted twice as long as typical. 

The Welsummers have yet to lay any new eggs since being consolidated into coop three. That was two weeks ago. One of the Welsummers is super low hen on the pecking stick. She's finding creative ways to avoid the other hens' pecking by hiding behind the water pail and fighting back when necessary while making a mad dash for the feed when the other hens get in the coop.  Hopefully, she will be able to regain her weight and strength soon.  

Coyotes are coming right up to the house with the colder weather creeping in. We've been locking the hens in at about 6:00 p.m.  The light set-up that I created for the two coops this year seems to be holding the lights in place without allowing the hens to knock them down. I have the timers inside of a hard plastic casing. This year, we have the lights coming on at 4:00 a.m. instead of 4:00 p.m., because last year, the ladies would not go to roost until the light would go out at 8:00! This makes it easier to corral them in as it is getting cold at dusk.   Live and learn what works for us.

Last weekend, we prepared the garlic and onions ground with old hay to help prevent deep freezing. It looks like we have about 10 garlic and about 15 onions.  Hoping  they make it through to spring.

Tuesday, November 10, 2015

Re-Group and Re-Coop

Well, it's that time of the year!  We have less pasture places to place the coops and with the lack of sunlight/new plant growth, we have to move coops more frequently throughout the area. Four coops was two coops too many! We have consolidated. We kept the "only 2nd year layer" of coop three, and she is now co-mingling with the 1st year layers. We also kept all of the 2nd year layers of coop two. Coop one's 3rd year layers will all be winter soup material by the end of this week. 

D has decided that he definitely "over built" that first coop. Without any wheels to move it along, the process of moving that big old heavy coop was getting to be too difficult to move in the winter, even with heavy slog boots on. That coop will be put away, for now. 

I have strategized a different "hoop" coop that we can build for next spring. We can work on it over the winter in the garage. It will be a combo of the coops we built last year along with PVC hoop (tunnel) pen. So I think we can get at least five to six hens in that one while it will still be easy to move.   

So, our thirteen hens are dwindling down to eight hens this winter. That will be plenty of eggs for the family with a few extra that we can sell.

Last night, at dusk, we pulled the three 1st year Wellsummer hens out of their coop. Just before that, we closed the door from the coop to the pen on coop three. Then we pushed all three hens into coop three with the remaining Russian Orloff (in the dead of night). Interestingly, no major fights.  I knew they would not fight in the dark, but wondered what the daylight would bring. They definitely kept their distance, with three in one part of the pen with the one in the other part of the pen. So, perhaps, they will work it out without any damage until they figure out a new pecking order. 

The moult has been a long one this year.  Don't know if the extra hot summer is the reason, or if all the house construction has just been too much stress on the hens. The 1st year layers, of course, basically grew up with all this noise, so they appear oblivious to the racket. Nonetheless, the coops are set up for winter with lights in place.  I attached some oversized plastic electrical boxes in the coops to protect the timers from constantly being knocked down.  Now the issue is the light socket being knocked out of the box... Oy Vey! Will need to work on getting that secured. 

Hopefully, we'll start getting some more fresh eggs in the near future! For now, we are only getting one or two eggs per day! Come'on Girls - let's get back to Egg'n!

Garden-wize, I wanted to make note so that I don't forget next spring, that I planted the Garlic and Onions about the 3rd week of October (10/18/15).  I had never tried onion seeds before, so I was not sure that would even work.  Due to the temps being in the low 40s almost every night, not much was happening even after two weeks. I put my plastic hoop house over the garden, and a week later, I had a nice sprout of onions and garlic.  It's dipping into the high 30s at night now, so I'll leave the hoop house up for another week or two. In the meantime, I plan on adding straw to the garden to help protect the bulbs from frost. Winter is on its way!

Sunday, October 18, 2015

Looking Back at Past Chicken Experiences

I was just thinking about when we started on this chicken raising adventure.  The first year, we lost three of the seven little chicks.  The chicks were purchased as "just hatched" from a well known farming store closer in to Portland. In talking with the store owner later in the year, I learned that others had a similar die-off experience. That store no longer sells Russian Oroff chicks.  That year was an unusually hot spring, that I feel contributed to the issue. But there were other things that I we have learned. For example, we initially placed the chicks into an aquarium and the heat from the lamp radiates off the glass, making the area that much toastier. We would have done better to use the little brooder heating shelf instead of the heat lamp in that environment. After the first year, we lost one of the hens. We think it was kidney failure. 

In our second year, we invested in one of the little brooder heaters. We purchased 10 Russian Orloff chicks from a different farm store. in anticipation of losing some, again. But this time, we did not lose a single chick. Additionally, we started them with a fine ground chick feed (non-medicated) and a little pro-biotic in their water. Also, the first week, we did not use any shavings. Instead, we used towels for flooring. We did switch to shavings a week later. After two weeks, we stopped grinding the feed and no longer added the pro-biotic. We ended up selling some of the hens because we just had way too many.  We kept seven, thinking that a family member was going to take three off our hands, but life circumstances changed and we kept all seven.  We got one of the hens back because she was a he. He is moved to a new location. We live very close to the city and we didn't want to cause any rooster ordinance issues (but we don't live in the city.)

The third year, we picked up five chicks. This time, we picked up Welsummer. We decided to use an old rabbit cage with sheets wrapped around it for a brooder. We used the brooder heater. We basically did the same as last year. We used towels for the flooring and ground their food, but we did not do the pro-biotics. Again, no dead chicks.  We gave away two chicks and kept three for ourselves. 

Looking back, losing those babies during the first few weeks of caring for them, was a really difficult experience. In fact, even when we lost the year-old hen, it was emotional. We knew that these girls were probably not as healthy from the start. We did not give up. We tried different techniques and approached the situations differently in hopes of giving the chicks a better, healthier start. 

One thing we know for certain now, is that, for the most part, these tiny little chicks are resilient, considering all that they go through to get to the farm store! Before buying the chicks, ask friends and neighbors about the store you plan to purchase the chicks from. Also, have a large enough brooder ready to go. Have a large enough coop and pen ready to go. Because let me tell you, these little chicks grow much faster than you can even imagine! Thanks for allowing me to share :)

Summer is done?

Carrot with male partsWe certainly have had a relatively mild start to fall this year. Last week, we had temps into the low 80s F. This week is starting off a bit cooler in the 60s. We had our first fall thunder storm Saturday morning. With the temps cooled down, I took this opportunity to do my garden activities. I needed to plant my garlic starts.  I'm also trying red onion from seed. I have never tried starting onions from seed before. We will see how this goes. I cleaned up my two raised beds. I have 22 garlic cloves in the ground and 18 onion seeds. I kept thinking that the rain would do its thing... while it has rained, it's barely been enough to dampen the surface. I actually had to water the garden today! I pulled the last of the carrots out too.  We had a couple of very large carrots, and as per usual, one "male anatomy" looking carrot. I always find this rather humorous. In a couple of weeks, I will need to throw steer manure on the gardens to get that ready for spring planting.  So we are off and running for the winter garden processes. (Sorry the photos are blurry.)

male anatomy carrot
All the older hens are still molting.  Even the hens that started molting the end of August are still working on the re-feathering thing. I'm guessing they may end up doing an eight week molt, this year. Most of the hens, with the exception of coop three, are almost done, though.  We are down to relying on the three new hens' eggs. We have used up all the light brown eggs that we had stored up.  It will be nice when the older cluck clucks get back to producing.

Oh, yah, we also have seeded with a ground cover mix to try to repair the hen/summer damage of the pasture areas.  With such a hot summer and hardly any rains, some of the areas that the chickens were pasturing has become really barren. We will need to reseed in the spring too, to catch the rest of the areas that are currently too hot with hen manure.

Friday, October 2, 2015

Triple Moulty Molt

This past week, the hens in Coop three have headed into the full on feather molt for the year. Coop one has been in partial molt since the end of August. There was one hen who has been pretty much laying an egg every other day, but I think she has given up. Coop two has had no eggs for about four weeks now. So, for now, we seem to be relying on the new girls.  We're getting about two eggs per day, so we should be fine with that. 

Darned Coyotes are hanging a little too close in our back yard. Neighbor told me the other day that he's noticed that we have a wide trail leading right up to our house from the highway. Also, he has noted that there are typically two or three coyotes pacing around the coops almost every morning now. That's not good.  I had commented about the crazy coyote we had a little over a month ago, wondering it it had rabies, but he suspects that it might actually be mange. We have an over population of coyotes in the area and that tends to lead to a lot of unhealthy stress in the groups, resulting in more disease. So, that's not good either!  Just another thing to have to keep an eye on. 

Well, anyways, hopefully, the hens will be done with their molt in a couple more weeks and we'll back in egg production soon. 

Monday, September 21, 2015

Sunday, September 6, 2015

Sweet Peppers and Eggs

New Welsummer Eggs next to Egg laid by older OrloffOur local temps have cooled way off and now we are getting much needed rain. This is a nice relief to all of us, chickens included.  The chickens are laying more eggs now, with the exception of the hens that are well into their molt. The three Welsummers have laid 10 eggs total in 10 days, so that's a good start.  We have now added oyster shell to their pen to help with shell production.  The shells are pretty thin at this point.  I accidentally stuck my thumb through one of the eggs while trying to pick it up. 


discolored circles on three egg shells WelsummerOne of the Welsummer layers is producing a lighter brown egg that has some funky looking discoloration on one side. There's suggestion that two eggs are developing side by side, causing the lopsided and "circle" band on one side. We will need to keep an eye on her since this is not a good thing. These photos show the discolored side and the back side. But, the insides looked good. The yolks are well formed, deep yellow and the whites were of the right consistency. So I'm thinking she will just need some time to get her laying process more established. 
discolored welsummer eggs backside
Discolored Shells but Inside is fine


Checker Board Eggs in CartonThe other two Welsummers are producing small, thin shelled dark brown eggs. I placed them around one of eggs that our older Orloff laid (top of page). The little brown eggs are so cute! The mix of light brown and dark brown in the carton has a cute effect too. A checker board of eggs.


All in all, we're now getting an average of four eggs per day. That will likely taper off over the next couple of weeks. 

yellow bells
Red Bells
Our bell peppers that we planted in five-gallon buckets are just about done. We have a nice mix of green, red, yellow and orange. So sweet and delicious. Delicious in an omelette, salad or just dipped in sauce.  Well worth the extra work and wait! Planting in buckets like this keeps the sluggos out and we can move them into the shade when it gets too hot outside.

Orange Bells


Wednesday, September 2, 2015

Doing the Mouse Stomp

I can't say that I'm a chicken behaviorist. I don't profess to understand what goes through the mind of a chicken. But I think the Welsummers are territorial! 

We live on several acres of untended pasture land. The stray cats, snakes, hawks, owls and coyotes feast on the mice that live in the pasture. Our backyard is not a coiffed parcel, but more pasture where the chickens can graze in peace, until a mouse tries to invade their space.  In the past month, the Welsummers have stomped, killed and played chase with little mice that get into their pen. Sure, I can totally understand why mice want to get into the pens, because the chickens routinely drop food on the ground.  But, obviously, if it mouse dallies at all, these gals are gonna turn that poor little mouse into an object of fun or revenge.

No, I did not take photos of the little squished mouse carcass that I found today. I pulled it out of the pen and threw it into field. 

By the way, all three Welsummers are laying eggs now.  We have received five cute little chocolate colored eggs.  Despite the Orloffs going into molt, we are still getting a few eggs from them, from time to time.

Thursday, August 27, 2015

Smoke, Construction, Coyote, Stress, minus Eggs... Until Today!

smoky haze out our back doorThis past week has been really rough on the Clucks! And the humans here too. Saturday morning we woke up to a thick haze and the strong smell of timber burnt smoke. The smoke of wild fires up in Washington was being blown south to us. Basically to the whole Willamette valley. The winds were not of the dangerous intensity, but enough to flip over things that were not battened down. As the day wore on, it got stinkier and smokier.

red dot of the sun in middle of dark smoke clouds The Sun looked like a tiny red orb in the sky. It was intense.  Sunday, the sky and smell was a little better, and by Monday, we were pretty much back to normal.

Then our new neighbors started on some new construction. Lots of saws buzzing along with the banging of nails and lumber. Plus, another neighbor brought in a tractor for mowing the tall grass that has been left unattended for more than a year (they are trying to sell the property) and so the blades were clanking as the tractor mower moved over the rock-hard ground, while hitting rocks and other debris that had not been cleaned up around all the nursery stock (trees).  It was extremely noisy and distracting, considering there's been no real attempt until this week to improve the appearance of the property for several years. The new activity was quite foreign to our ears, after all this time.

coyote carrying preyEarly Monday morning, we heard a dog in our backyardish, barking and barking.  When D turned on the yard spot light, it didn't stop, which we thought was hugely odd. Then, all of a sudden it yipped and yodeled... Ahhh, it's a coyote.  But it was persistent! It was not going to leave. After about 15 minutes of all this coyote noisy ruckus, it finally quieted down, and we assume it left.  We could not actually see it.  It was not near any of the coops. So we didn't do any active attempts to find it or scare it away.  But when I was leaving the house to go to work, next to the garage door, laid a dead wild bunny with its face mauled off.  That was disturbing enough, but even more disturbing was the white gravy looking substance on it's neck and hind quarters. There was even some on the pavement around its little body. I have never seen anything like that on dead victims of coyotes, and believe me, there are lots of coyote victims out here for us to find.  This photo is not from our area, but the image accurately represents what we see/experience a lot. So, no, we would never leave our chickens unattended or free to roam across the acreage. 

Between all the smoke, noise and predator filled activity this week, our poor chickens have been stressed to the max.  Add on the fact that several of our Orloffs are starting into their molt. It has not been a good week! So, we have received only two eggs from them, so far, this week. (Until today!) This morning, when I went out to check, there were hens (four) in all the nesting boxes. This should be a BIG egg delivery day. :) 

half dozen eggs - 4 orloff and 2 welsummers laidAdditionally, we have been waiting and waiting for the new chickens to start laying eggs.  The Welsummers, according to what I have read, can be late bloomers in the egg laying department. I have read that they can start, basically, anywhere from 20 weeks to 40 weeks, with, of course, 30 weeks being the average.  But, regardless, I have been checking their box every day right along with all the rest. At 22.5 weeks, it's a WooHoo day for the Welsummers. Two cute, small, chocolate-colored eggs were laid this morning! 

half-dozen eggs in egg carton
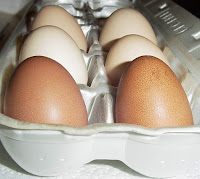
Our Orloffs' eggs are a light brown (almost pink) color, weighing anywhere from 45g (1.6 oz) to 67g (2,4 oz) The large eggs are laid by the older hens.  The year old hens typically lay medium sized eggs with a few large ones, on occasion. (I'm using the USA egg size standards). Different countries have different standards for determining egg sizes. Anyway, the new Welsummer pullets are now starting to lay eggs which are distinctly different from our Orloffs! A nice deep brown egg with darker little speckles. The first eggs are 43g/1.5 oz and 41g/1.4 oz. Small and narrow, but it's a start! They will get larger as time progresses.
eggs in shell on paper side by side for size comparison
In the photo with the eggs on the paper, left to right, 1.4g, 1.5g, 1.7g, 1.9g and 2.1g.  The first two are considered small and the last two are considered large. There you have it. 

I have been apologizing to the chicklets every day for all the stress. Finally, things have settled down and we are getting back to normal. Plus, the added bonus of the new pullets joining the ranks with the other hens. 

Saturday, August 8, 2015

An Evening Out with the Orloffs

First and foremost, I apologize for the fuzzy photos.  I really should have used my tripod! 

Two Orloffs - 16 months oldYesterday was an eventful day! Normally, we keep all the hens/pullets penned up for safety reasons.  There are plenty of predators out here, even in the daytime, from Hawks to Coyotes, Feral Cats and Neighboring Dogs. Also there can be some traffic zipping past our house, on one side or the other. D and L wanted to investigate how well/close the chickens would stay in proximity to the house and their coop. Will they venture over onto the neighboring properties? Will they slip out into the field? Will they attract the predators? Will they proverbially, "cross the road?"

three orloffs under the treeThese are the soon to be dinner chickens. They have been the least productive peep that we have experienced to date. We should, at the very least, get 14 eggs per week from them, however, if we are lucky, we get 7 per week.  Typically we get 5 per week. That's food in their bellies without giving much back. Breaking it down, that's about $12 per month expended on all three of them in food (organic), grit, oyster shells, other supplies and coop cleaning efforts.  At the price I sell the eggs, I would only recoup approximately $6 per month.  That's not even breaking even! Soooo... something has got to give.

Orloffs in forage mode
Of the other two coops, the hens are costing us about the same, $12 and $16 ($28 total), but, if we sold the eggs from the other two coops, we would  recoup about $40 per month.  But we don't sell all the eggs.  Of course, the real benefit to us is that we know we have healthy, happy chickens laying the best chicken eggs in the territory! :)  We personally, can't eat all of the eggs.  Essentially, we try to sell just enough to pay for the grain. So it's not like we are making a "killing" on selling the eggs. On the average, we sell about 2 to 3 dozen eggs per week and eat the rest for ourselves.  We are recouping about $9.00 per week, but the benefit ratio would be better without the three non-productive eggers. Then, of course, there's always the 6 week molting period where a chicken basically does not lay any eggs. We are heading into that period in a few more weeks.

Free Roaming OrloffsSo, that being explained, the question was raised, how safe would it be to let the hens roam the property, on their own during the day, letting them forage more freely outside the safety of the pens.  Our property is not well fenced.  There is a fence for the pasture where the horse moseys around, but even that is not something that slows down any other critter or predatory animal.

Orloff looking for bugs on a windy eveningThe "experimental" hens stayed pretty close to their coop.  They ventured, at most, about 75 feet from it. They did investigate the horse, by running between his legs while he was noshing on some green grass. But, for the most part, they stayed close to the opening of their pen, under the trees.  They did not venture into the field.  It was close to twilight when I let them out, so that might have been a factor. But they did stay outside longer, well after dark, after the other hens had already gone to roost. We will try letting them out again today, a few hours earlier in the day.


Friday, August 7, 2015

From Pullets to Hens

At about 18 weeks, I like to introduce the nesting boxes to the pullets.  The Welsummers are much louder brawkers than the Orloffs, so they were loudly expressing their excitement to the new addition inside their coop. Until now, I have had the nesting box blocked off, inside the temporary coop, to keep the pullets from thinking this is a sleeping area. The Welsummers are 19 weeks now, heading into 20 weeks on Monday. They are "of age" to start laying eggs. While, in reality it may take another few weeks, but we will need to start checking the box at least once a day.  Our Orloff pullets don't start laying eggs until at least 24 weeks.

litter box for nesting boxI was struggling with ideas on ways to reduce the size of the box to cozy it up a little.  The box's inside dimensions are 11" by 11" (depth and height) by 16" (width). There is no lip to hold in the hay and hey, 16" wide is much to wide for a standard sized hen.  Even in our first coop, with 12" by 12" by 12", we will frequently find two hens in one box.  And yes, they will both be laying eggs.  Even though they have two boxes available!

litter box as nesting box other sideBack to this coop and its oversized nesting box, I had a hardly used cat litter box that I had purchased for my kittens a few years back. It's too small for them as cats, and it hasn't been used for a very long time.  I bleached solutioned it first, then after drying it out, I raw vinegar solutioned it.  When I say raw, I mean home-made strong apple cider vinegar.  I think it will do the trick, but we will see. 

I placed hay in the litter box inside the nesting box. It will either work, or it won't.  If not, I'll look for other solutions. For example, I can buy pre-made nesting boxes at the farm store.  I'm just trying to save money since the hens won't be in this particular coop for the long haul.  The three hens that are only producing occasionally, will be in the freezer soon enough. That will free up one of our home-made coops with built-in nesting boxes that work much better. 

As for my gardening news, the garlic that I planted early last month is starting to sprout.  I was waiting (and waiting) and thinking, well, perhaps I screwed up.  So I planted Cilantro in the pot about two weeks ago.  Cilantro in the Garlic PotWhen, all of a sudden, today, I see a little garlic sprouty shoot up. I've read that garlic must "winter" over in order to clove up.  So, I guess it makes sense that the garlic took this long to sprout. The first photo is the same as the second, but the second has a yellow hexagon on the right-hand side to draw your focus to the spout. LOL
Cilantro in the Garlic Pot to "locator" to the Garlic Sprout


Friday, July 31, 2015

Hot Summer Daze Pt-2

When I hung the basil outside to dry, the temperature maxed out at 96F in our area.  The basil was not done drying on that first day.  I hung it over our water heater for the night, then brought it back out the next morning for another day of drying (yesterday). The outside temperature hit 101F (for our area - other local temps were a lot hotter). The smaller leaves were dry by 7:30pm but some of the larger leaves were still limp.  I hung them over the water heater for the second night. The one row of larger leaves is back outside for the third day. While the rest of the leaves are pictured in a bowl, below.  You can see that they are ready to be crushed/crumbled.
large basil leaves still drying on day three
large basil leaves still drying on third day

small basil leaves dry and ready to crush
smaller basil leaves ready to be crushed

The hens laid five eggs yesterday in the extreme heat, which is totally unusual! But I'm not gonna complain about it.  I had to keep switching out frozen water bottles with the thawed ones next to their nesting boxes.  In each coop, the girls have a "favorite" box and the other tends to remain unused.  On a rare occasion, they will use the other box, in fact, a couple weeks ago, I found an egg right next to the thawed water bottle! Hahaha. Below are images of the "frozen" water bottles that we put in the boxes and in their pens. Plus, we change out their drinking water a couple of times per day on these super hot days. 


nesting box frozen bottle next to favorite laying box
small frozen water bottle next to fav laying box

Partially thawed frozen bottle in a coop area
large bottle in pen already partially thawed


In early July, we did try to use some makeshift swamp coolers for them, but they were unsettled by the noise and the breeze, so we went back to the frozen bottles. They will lay near it and are more calm about its presence, so that's our technique.

Another first in my limited experience.  Sun Scalded Bell Peppers.  I've grown bell peppers for a few years (all totaled, past and present, about 10 years).  I have never encountered this in our neck of the woods of the PacNW region.  I lost a considerable amount of fruit before it was even fully ripe ;(


Sun Scalded Bell Pepper

Another damaged bell pepper

a lost of damaged bell peppers!

Wednesday, July 29, 2015

Hot Summer Daze

This summer has been especially hot for the PacNW. We have had more 90°+F days already this year than I can ever remember, and it is not even August yet.  Anyways, the chickens are surviving, but certainly not thriving.  Many of them have done a "mini-molt" and we are lucky if we get more than two eggs in a day from the ten layers on these hot days.  And Molting season is coming up soon, so I'm not sure that to think at this point. 

Here are the three new pullets.  Welsummers with their combs and waddles filling in and coloring up. They are definitely noisier than the Russian Orloffs! But their disposition is just as sweet.  They loved the young spinach that I pulled up for them.

Welsummers - 18 weeks   

Welsummer pullets - 18 weeks


The Basil is growing well.  I'm trying my own "solar drying" technique.  Not wanting to have any of it blow away because we almost always have some amount of wind out here, no matter how hot it gets, I put a thread (on a needle of course) through the leaves near the center vein of each leaf then tried to space them out so that there's some air flow.  The first one, I didn't think it through very well. I put the larger heavy leaves on the outer ends of the thread, and being heavy, they want to all slide into the center.  The second one, I pulled the thread more taunt and there's not much sliding going on. Also those leaves are not quite as large. But, we have 90°F already today, with the winds, and the humidity is low enough (32%) helping with the drying process. I'll bring them in at twilight today because the cool down outside at night can contribute to mildew. If they are not quite done tomorrow morning, I'll put them out again to finish up the drying process. Also, I was told not to put them in the direct sunlight because it can bleach out the flavor of the basil. So there you have it. Heck's fire, it's hot enough to even dry up a batch of solar jerky, if I have a mind to! 

Solar Dry my Basil    

Solar Dry my Basil - better string

Sunday, May 24, 2015

Nine week old Welsummers in Temporary Pen/Coop

Hexagon Coop and Rabbit pen.  We made a few modifications to secure the flooring on the coop and found that the door for the coop fits just inside of this long "rabbit run."  Way better than we expected.  We may need to put a little reinforcement round the bottom of the pen to keep it more sturdy and stable, but for now, I think we are okay with how it works.  The plan was to sell off three of the oldest hens, but that's not working out so well.  People want them for free... well, since the hens are currently laying about 18 eggs per week (collectively), I'm not going to just GIVE them away.  So, for now, we will keep them since they are still producing so well.

Anyway, the cage has a metal "stabilizer" bar in the middle, and I know that the pullets will want to roost on it, so I wrapped it with a rope to give them leverage.  I will be finding a pole or something that I can use to hang the feeder on in the corner of the pen to get the food up off the ground and less accessible for the mice. Then we should be fairly "good to go."  heading into the summer months with the pullets.
 
Temporary Pen - Sun and Shade AreasWelsummers at 9 weeks in temporary pen


Pen and Coop togetherTemporary Rabbit Run Pen - tarp to keep the rain off


Large Rabbit Pen/Run for the Pullets

New Shorter DIY Rainproof Chicken Feeder

Now, with the Welsummers in the smaller pen, we needed a shorter feeder. We found a laundry detergent bucket that was just the right height, so with a few minor modifications to the last rain proof chicken feeder design, we have done it again.  Since this was not a food-grade bucket, I made certain to wipe it all out, then soaked it overnight in a bleach water solution, then wiped it down with apple cider vinegar, just as an added cleaning agent to try to ensure that all the soap/detergent was removed.  One bucket, two 9-inch long 1-inch PVC sliced open, six short sheet metal screws (to attached the PVC channel inside, one piece of plastic corrugated signage board, two L brackets, and six screws and nuts to attach the rim. I made a smaller opening on this one and it seems to be way more balanced without having to add any weight just inside the top of the rim.
Rain-proof Chicken Feeder - Looking down at RimShort Bucket Rain-proof Chicken Feeder Side view

Rain-proof Chicken Feeder - inside adjustment for grain gravity feedRain-proof Chicken Feeder Looking up at rim and inside

Rain-proof Chicken Feeder - looking inside at PVC and plastic boardRain-proof Chicken Feeder - other side view

Rain-proof Chicken Feeder - different angle of sideRain-proof Chicken Feeder - Straight down inside with L brackets