Showing posts with label Nesting Box. Show all posts

Thursday, June 29, 2023

Shredded Straw for Nesting and Coops

Ever since we started raising ducks, we have been using straw for their bedding as it is inexpensive, more absorbent and the ducks are less likely to try to eat it BUT straw can be brittle, and sometimes sharp on their feet and underbellies. Last fall, I saw a guy using a wood chipper to shred the straw for his ducks, which I thought was a good idea, but didn't want to invest that much money on something dedicated to breaking down straw.  After more reading this past year, I decided that I would try a leaf mulcher, but I wanted something that was inexpensive, battery or electric, and easy to use.  Most of the inexpensive leaf mulchers were combo leaf and small branch chippers, and well, I didn't like their designs. I opted for a glorified weed whacker in a barrel type of leaf mulcher.  It's noisy, dusty, and kinda messy, but it got the job done quickly without a lot of extra effort. Dumped a five-gallon bucket of straw into the device, and whizzzzzzz, it was done in less than a minute. 

While I won't "promote" any particular product, but I'm guessing you would be able to figure it out if you went searching for leaf mulchers. 😁

And the final product to the right of the original bale. 

Left is Baled Straw and Right is Shredded Straw


Tuesday, August 11, 2020

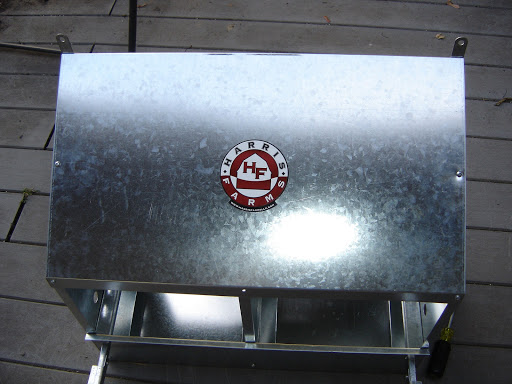
How to Assemble (DIY) Harris Farms Nesting Box (Hint ~ The instructions are almost useless!)

 It took me 2 hours to assemble the nesting box by myself with a phillips screwdriver and 8mm socket wrench. The instructions are semi-understandable but they leave many of the fine details out. So I will explain some of those for you. The images can be clicked on to enlarge.

This guide is for the two nesting box metal version, but I'm assuming that the others are not too much different. 

1) Have some WD40 or some other synthetic lube handy to help start the nuts on the bolts. They are locking nuts with nylon inside, and on occasion, some of the nuts are rusted. The nuts are described as being 5/16". 

2) Count the nuts and bolts (aka screws). There should be 28 short bolts, two longer bolts and 30 nuts. 

3) They will recommend that  you "finger tighten" the nuts, but with the nylon on the inside of the nuts, that's next to impossible.  Using a screwdriver and wrench, I just didn't quite tighten them all the way until almost the very end. 

As instructed, do attach the divider panel and outer panels to the back piece at the bottom.  I chose to have the bolt head on the inside the box with the nuts facing out on the back.  The bolts are a bit longer than necessary so there is some sharp portion exposed, and I wanted those to face away from the chickens, especially on the ones that don't get covered by the base/floor. The example below is when it was almost finished, but is a good example of how much of the bolt is exposed. I wanted as many of those facing away from my hens, as possible. 

Nuts exposed on back side of box
 

4) After getting the side panels attached to the back piece, now you need to attach the front panel. It is not totally clear if the side (bar) holes should be near the top or bottom.  Place them near the top with the metal lip facing away from the box. I did put the bolt heads on the outside with the nuts on the inside of the box on this portion. My hens like to push far back into their boxes so I felt that this would be a relatively safe choice. This next photo, again is showing more than you need just yet, but you seen the lip is facing outward, and the bolt head is also outside the box, opposide of the ones on the back panel. 

Example of front panel connection to side panels.

5)  Remember don't quite snug everything up just yet, just tight enough to be stable. It's times to attach the long perch bars on the inside of the box. These look like U shaped bars a short piece that will stick out through the holes on the front panel. They should be "mirror" pieces that look the same but with holes drilled on opposing sides of one another. It is not real clear which goes on which outer panel. The image above actually will give you a good hint. The U should be facing downward and the holes should align with the outer panels.  Insert them from the back side and slide the short section through the front panel holes. 

Example of long perch bar installed on side panel.


6) The short perch sections are the folding part of the nesting box perch. I think those are pretty self explanatory based on the picture below.  Use the short bolts to attach them to the long perch bar BUT don't over tighten, or at the very least, use a washer before attaching the nut so that you will be able to lift the perch upwards, to "close up" the nesting boxes. 

Connect short perch bar to long perch bar.

7) Attach the perch to the folding perch bar with the longer bolts. I will alert you that the flooring in the example here is WRONG!  So don't follow that portion or the bottoms will fall out unless you have the nesting boxes setting on the floor of the hen house. But the example for the Perch is correct. You can tighten the wood perch to the perch bar since there won't need to be any adjustments after this point. 

Attach Perch wood to short perch bar.

8) Now it is time to attach the top panel. While the instructions will suggest that now is the time to insert the floor sections, I don't recommend doing it until you have the top panel on. Another recommendation is that you attach the hanging brackets last.  It is much harder to attach them last if the front portion of the top panel is all attached and in place.  

Instead, attach the hanging brackets and the top panel on the back by laying the box on its side so that you can angle your screwdriver/socket wrench up under the top panel. As you can see in the example below, I was able to push the front portion of the top out to give more room in the top steepest angle from the back.  I also secured the center/divider panel to the top back in this same way before moving to the front.  I continued on the same theme of bolt head inside, nut outside, but that's not necessary if you want the top of the box to fit more snuggly to the wall. 
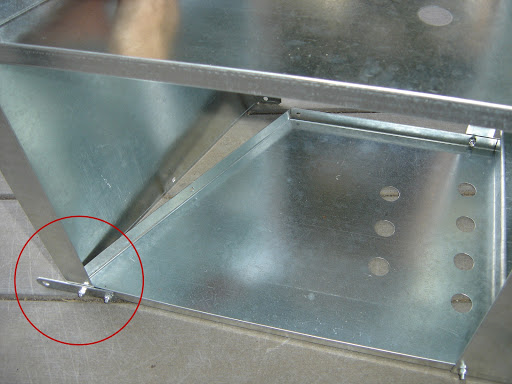
Connect Top panel to back side panel.


9) We're heading to the home stretch BUT things may get more challenging. Once you have gotten this far, you may discover more difficulty in lining up the holes.  I ended up wedging a large nail into the holes to "enlarge" the openings a bit and helping to align the two pieces. I attached the two sides of the top panel, then attached the two front outer corners of the top to the front side panels. I encountered issues with the center panel with the top panel and well, yah, I gave up at the point. I tightened up everything else at that point, and I think it is about as good as it is going to get. 

Finished Box from back view.


Top Panel Attached back, sides, and front.

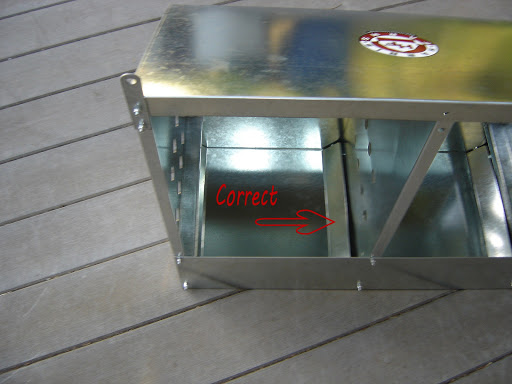
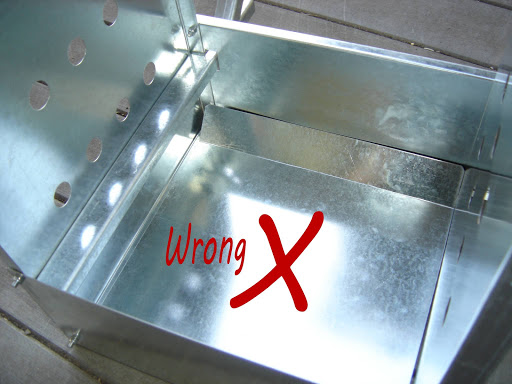
10) I put in the floor the correct way, and now we are off to install the nesting box in the hen house. Be sure to secure the nesting box with the brackets to a wall or 2x4, or something stable, because if the hens step onto the perch, it will fall forward onto them. 

Floor installed correctly.

Floor installed incorrectly.


I hope this helps you with a better assembly of the  Harris Farms Nesting Box!

Monday, July 20, 2020

New Flock Egg of 2020

So the Rhode Islands were hatched, if I remember correctly, about March 15 this year. It is only week 18, and someone laid their first egg.  I got that makeshift nesting box installed, literally, last night after the pullets had roosted.  I had ordered a couple of square three gallon buckets that have yet to arrive. Instinctively, with the new moon last night, I felt that it was a good time to get some form of nesting box installed, temporarily, at least until the buckets arrive. I taped some water-can boxes around the sides to create the "enclosure" and a cardboard lip to hold in the hay.  Today, I had been looking all day for the fake egg to set inside the temporary box to help them to understand that this was the "nesting" box and not a new bed for sleeping in. I finally found the fake egg and headed out to the coop to put the egg in.  Boy, was I surprised; there in the box was the first egg! Crazy! So, yes, I had to run and grab the camera.  


New Flock's First Egg...

Is In da BOX!

Barred needs to get in the photo

What is that thing?

The Funny Temporary Nesting Box

That Actually Works!

Perfect Timing :)

Saturday, July 18, 2020

Red Clovers and Pullets Update July 2020

Gardening is finally full on. Took some time and persistance with the crazed weather and temps. But corn is three feet tall now, just starting tassels and I have put the last dose of manure on them before I switch over to the bone meal and potassium. I pulled about 30 apples, either sick looking, had worms or there were simply too many in a bunch.  I think there will be about 70 left to harvest later. I threw those apples into the compost pile. Sun has been too hot for the tomatoes so I now have a shade cloth for mid to late afternoon, then I take it off after 5 as the peak heat has hit and the sun is headed west. The clover that we planted in the first batch is nice and lush. I'm happy with it. 

Red Clover,  Red Clover
Red Clover, Red Clover, Send.... 


Pullets, are just about ready to start laying.  These ladies are super friendly. Love their treats. I need to concoct some type of nesting boxes for them.  I'm hoping that the square buckets that I ordered will be large enough.  

I'm speculating that the Rhodes will being the first or second week of August, while the Barred may not start laying until the end of August or even the first of September.  We reallyl don't know their hatching dates, so that will make it a bit harder to determine their ages when they start. 

We moved them onto fresh grass last night, and they seem quite happy with the fresh cool blades of grass under their feet.  The Barred are super smart and curious. They are a fun breed to have. Collectively, they are a bonded flock now, but there is still a special connection between the two Barred Rock within the flock. 

Barred Boot Inspection
Rhode Boot Inspection
My Good Buddy Barr
I Want Pets too
Rhodie Buddies
Curled Neck Feathers
Barred Buddies
A check in
A different check in
All check in


Tuesday, July 3, 2018

No Sooner Said. . .

We got our first egg from the Rhode Island Reds. Pretty good size, in truth. That means that they will get larger over time and practice.

The Welsummers are NOT happy that I accidentally left a thistle in their run.  They knocked down everything around it, but, yah, I don't blame them.  I will get out there tonight and get that sticker out so that it doesn't continue to be a hazard for them.  They will, on occasion, lay an egg in the fresh grass as though it is a pile of hay in the nesting box. Sillies.

New Egg was laid next to the fake egg.  I have the circle on the fake egg so that the kids won't carry it in thinking it is a real chicken egg. The comparison photo is a bit blurry. Sorry 'bout that. 

Photos of the RIRs also include the new feeder.  That little black knob that sticks out at the bottom of the opening becomes a weight that pulls the opening closed if a rodent gets on it to get into the feed. The RIR are very curious birds.  Much more so than the Welsummers which are a bit stand-offish. 

1 year Welsummers

Please Remove This!

The Grass is Cooler than the Nesting Box

First Rhode Island Red Egg & Marked Fake Egg

Rhode Island between 2 Welsummer Eggs

Hen, Water & New Feeder

Safety Knob

Rhode Island Red in New Pen

Whatchcadoin?

Another RIR Close Up

Monday, July 2, 2018

20 Week Marks Maturity for Rhode Island Reds

While different breeds of chickens mature at different rates, the Rhode Island Reds are showing their maturity with right red combs and broader hips.  I don't have photos today and it is a cloud filled day, so the photos typically don't turn out well on overcast days. I will get some photos soon.  The pullets have been moved into the smaller coop (the one designed for three large hens) and are adapting to the new space.  They had a lot of space while in the hoop coop because, of course, that was originally designed for two turkeys. 

So the Rhodie's space is now about one-third of what they originally were maturing in. I will also take photos of the new feeder that D purchased that is designed to keep mice and rats out of the feed. His intent is to pick up another one if this one works.  The rats and mice are thick in our fields, so it is always a battle to not feed them. The feeder is designed to close down when ever a mouse/rat pulls on the lever to get into the feed. I have a mini-cam that I will also be putting out into the run to see if this thing is actually working. 

He purchased it last winter, but the Welsummers were not smart enough to figure out how to get their food out. He decided to wait for the Rhodie's to mature to the right height to see if they would figure it out.  And they did, within minutes of it being set up.  Go figure? 

This was the coop that we discovered had been leaking last winter.  We got the leak handled, but it did in the flooring. That has been replaced with painted particle board. We bleached down the walls, installed the floor and aired it all out for the new flock. We will paint the outsides of it soon, in preparation for winter.  We have new shade screens for both runs since the weather has been harsh on the one we picked up several years ago. We also need to create some new wind screen boards this summer before the fall east winds kick in. With all the rain that we get, the wood rots and gives out after a couple of years, even when it is painted/stained. 

We had a bit of a scare.  When I was carrying one of the pullets to their new digs, I stepped in a hole and my legs went out from under me. I fell forward, almost crushing the poor chicken. It all happened so quickly, I didn't have time to react to let her go and we both went down together. She is fine and I'm healing.  

Since the RIRs have hit "maturity" time, I have hay and a fake egg in the nesting box to help spur them into laying now. 

Garden is better than last year.  We have several bell peppers already, about four tomatoes on one early plant, the potatoes are ready for the dig out, the corn is about knee high, the onions are starting to grow, the first of the three bean plants is flowering, oregano, basil and dill, plus the carrots and radishes are growing quickly.  The garlic is basically ready for the dig up, although they are smaller than I had hoped, but, they survived the winter, so that's a plus.  I did notice some aphids on one plant, so that's likely to be the next battle. If we can have a relatively unhumid summer, we should have a pretty good crop of the plants in the ground. I am hesitant to mention it, for fear of jinxing anything, but I have not seen any slugs!  Usually, by this time of year, we have massive slugs moving around. On the other hand, we have tons of snakes this year, and it may be that they are eating those slugs for lunch. Hope so.  I would much rather have snakes than slugs in my garden, any day of the week. 

Monday, December 25, 2017

Christmas Eve White Christmas

Last year, we had a sudden snow storm on the 15th of December that caught us off guard and ended up with snow inside of the chicken pens.  This year, we had the shields in place before the snow started flying.  We did not get as much snow this year and some of it was freezing rain so it was quite the mix between the two.  Yesterday was so blustery that the wind chill dropped to 16F even though the temps were closer to 30F. We even had a few gusts of 40mph. So, yah, it was bitter cold on Christmas Eve.  

Thankfully, Christmas day has been calm, although it never really got much above freezing. The new chickens are stressed by the snow, but the older chickens seem to be taking it in stride. 

We have a gopher this year that has been taunting the chickens, tunneling under their coops and into their pens. The coops have floors, so it's not like the gopher is adding tunnels into their coops, but my guess is that, either the gopher or mice using the tunnels are getting an added food resource this year.  We do not seem be going through feed quicker, so I don't think they are able to get into the hanging feeders, but I know that the chickens do drop food on the ground, giving the field critters access to the spillage. 

Some of the hens are still laying, so we got a few eggs this weekend. Not as many, but some eggs is better than none eggs. 

Facing East
Facing West - Coops, Cars & Hills
Light dusting of Freezing Rain and Snow
New Hens at the Feeder
New Hens Confused by the Snow
New Hens Perplexed in a Row
Egg in the Nesting Box on Dec 24
Dec 25 More Freezing Rain
Freezing Rain on Coop 1 (older hens)
Freezing Rain (and Snow) on Coop 2
Nesting Box lid Warmed by Hens
Egg in Nesting Box on Dec 25
Gopher Hole from the Field
Gopher Hole and Trail to Hole under Coop 2
Close up of Gopher Hole under Coop 2
Gopher Hole on Other side of Coop 2

It is supposed to warm up tomorrow - we will see if that happens.