Thursday, July 22, 2021

It's Always Interesting - Summer 2021

Yesterday, I picked our first tomato.  It's a mystery tomato from a multipack and none listed varieties on the pack match up with what this looks like.  Kind of a small Cinderella, yellow/orange orb. 1.6 oz and almost 2" across.  The photos are taken on a tile that is 3.75" to give a good reference of it's small size BUT not cherry tomato size. 

First 2021 Tomato - a Mystery

A small Cinderella?

We do have a lot of green tomatoes, some that look like oxheart, but mostly like beefsteak varieties. I know that we had at least four plants that were Cherokee Purple, and then the rest or mystery heirlooms from Ed Hume's "early heirloom" pack. 

I also harvested a purple and a red bell pepper.  No photos - they were instantly cut up and added to a salad last night along with a walla walla sweet onion. Very Sweet! 

The past couple of weeks, one of the Salmon Faverelles has refused to roost on her own.  I was expected to walk out there each night to pick her up and carry her over to the coop to place her inside.  The first few nights, she wanted to come right back out and I would stand there, blocking the door until she would hop up on a roost.  She generally does not roost nest to other birds, but will. She would then stay in there the rest of the night. Several weeks of this.  The past two nights are the first night that I have not needed to put her into the coop. So, hopefully, this is the end of that game. 

I checked the nesting boxes like I usually do one last time at the end of the day, and discovered a bit of a slime ball of an egg.  It was a little like a no shell egg, with just a smidge of a shell like layer on it.  The yolk is visible through the translucent layer, and I tried to show that in the photos, but the light reflects too much, and I don't have the best camera or the best lighting. Anyways, I am assuming it is just a newbie egg for now and hope she improves with age. They have free access to oyster shell at all times, and I don't see any pullets being chased away from the oyster shell bin when I am out there. The egg is actually a fairly good sized egg. Just not sure at this point. 

Almost Shell less Egg - tried to show the yolk that is visible through the layer

Rolled the egg over - and the shell is such a strange texture


Saturday, July 10, 2021

July is Here 2021

 Well, generally, June was a busy month, but it got too hot near the end. Breaking high temp records, day after day was too much. Even the over night temps were too hot to bear. Then, right after the extreme heat, we had a windstorm that blew over a third of my corn.  Thankfully, the corn was still young enough to prop back up and get back on track. 

To combat the intense heat, I put shade covers over the potatoes and the tomatoes. The onions mostly wilted and toppled one by one.  They did not get very large before that.  I only had one left that got to a good size.  Pulled up the red bunching onions and they are very good. More like scallions than anything. Surprised that the broccoli is still producing, even during the heat. Not large ones, but a lot of bite-sized heads. Everything in buckets ended up under the trees for shade and we did not lose any other plants (aside from the onions needing to be harvested) in the extreme heat. Thank Goodness! 

A week after the extreme heat, I had to harvest a lot of herbs, basil, rosemary, oregano, and thyme to keep them from flowering. Onions still have a great flavor and we are eating them as fast as we can. 

Onions and Garlic

Not sure about the garlic.  But we are trying something different to see if we can back.  Even before the heat, the garlic was looking sad. Will see if we can get any to survive. Beans and carrots did fine in the heat. Beans are flowering now.  

Beans are Blooming

Put the Cucumbers out late.  I didn't want to put them out just before the extreme heat, So plants were transplanted right after the extreme heat days just before July.  I noted a flower on one of them today. Yay! 

Cucumber Starts

Peas are not thriving. Hanging in, but mostly just using them as a paper weight. They are holding down the edges of the sunshade for the house. 

I didn't take pix of the tomatoes or peppers, but they seem to be doing very well. 

Potatoes in the square garden are going strong. At least above the gound. Not sure about under ground. 

Potatoes

Corn was planted in sessions.  I planted 15 the middle of May, then another 15 the end of May and the last 15 the middle of June. The first batch is tasseling. The second batch looks good, the third batch suffered from the extreme heat and only some survived. So, we will see what comes of this experiment.


Corn Planted in Stages

First Corn Tasseling

We had put the pullets in with the hens about mid June.  The transition was a bit rough, especially for the Faverelles.  But it was slowed down a lot by the extreme heat. None of them wanted to do much of anything, let alone chase one another.  We set up three food and three water stations.  This past week has been the first week where they all go to the coop and stay for the night.  For weeks, we were having to take them out of the nesting boxes and put them inside the coop. The first week, we left the bars on the boxes down so that the pullets would have a space to get away from the hens. Last week, we started closing the boxes late in the afternoon, and they quickly adapted to finding space in the coop to sleep. 

Barred Rock Hen

Rhode Island Red Hen

Rhode Island Red and Barred Rock Hens

Rhode Island Red Hen Walking Away

Another Rhode Island Red Hen

Production Blue Pullet Shaking dirt out of her feathers

Blue Barr Hen Looking Away

Faverelle Pullet

Pullet Tails

This weekend, we are trying to sell the hens. We have chicks arriving this next week. 

That's pretty much the update. 

Saturday, May 29, 2021

End of May 2021 Garden Update

 The end of May is when I have the majority of my garden started.  I will start more dill and basil seeds but they will be in the garden.  Last year's basil and dill was a bust with the crudy June weather. Several of my friends made the same comments about basil and/or dill seeds simply not coming up. I started basil and dill late last fall in the green house.  The dill started growing, then wintered over and took off in the spring. I can't transplant dill, but they did fine in the grow bags. As you can see, they grew to just under seven feet tall. I'm about ready to pull them and dry them for dill pickle usage. I was able to collect four large bundles of dill weed leaves to dry for other cooking purposes. So that made up for last year's bad growing season. The basil did not come up in the fall.  I planted a bunch again in March in the grow tent and they are nice sized for now.  I only kept six for myself. I'll leave them in the grow bags, but will also plant some seeds in the garden bed. 

Dill Plants at almost 7 feet tall Huge Dill Flower Heads

Basil Plants are doing well in Green house

The Oregano, Rosemary, Thyme, and Lavender successfully wintered over, outside.  Lavendar is starting to bloom. The Oregano and Rosemary are ready to harvest for drying. 

Rosemary is Ready for first HarvestOregano is Ready for first Harvest

Lavender is starting to bud

The potatoes in the green house are starting to blossom. If I don't get at least seven pounds of potatoes per bag, I'm going to give up on trying to grow them in containers.  If I don't get at least 15 pounds worth in the garden, I'm going to give up all together.  I did add sulfer when I planted them in the garden.  I have been covering them when we have downpours. So if none of my efforts make a difference this year, then I may just hang up my potato growing hat and leave it to the experts. 

Green House Potato Experiment - starting to flower

Russets today in outdoor gardenbed 5-29-21Russets covered in outdoor gardenbed 5-23-21

The broccoli heads are forming. Yippee! I had kept the broccoli protected in the netting cage until yesterday. We had several wind and rain storms the past week, and with them being so tall, I didn't want the wind to flatten them. 

Broccoli In Netting Cage 5-28-21

Broccoli is forming some headsSmaller Broccoli head


Bunching Onions from last fall are maxing out with nice sized firm onions. The next batch are growing.  I should start one more for fall harvest. The walla walla sweets are growing well. Garlic that I wintered over and moved are finally starting to look better. The shock of the transplant seemed to slow them down. 

A few Red Bunching OnionsGarlic, Walla Walla Sweets, & Bunching Onions

In that same garden bed, I started a row of radishes, two rows of carrots, and two rows of green beans.  In some of the "holes" around the garden, I started some marigolds. All of these were planted on the same day, two weeks ago on May 16. 

Marigold Sprouts 5-29-21Seven Bean Sprouts - two are a bit slowFirst Bean Sprout on 5-23-21Carrots are peeking out 5-23-21

Radish Sprouts 5-23-21

The corn that I planted two weeks ago is mostly up. I needed to reseed in three spots.  I'll plant about 15 more seeds on Sunday or Monday.  My hope is to have three harvests this year.  The photos are a week apart. 

11 of 15 Corn sprouts about 1 inch tall 5-24-21A few more corn sprouts & now some are 2 inches tall

Peas. Crazy peas. These gwo grow bags were all planted sequentially with four seeds two weeks apart, as in each bag got four seeds every two weeks. Can you tell which bag is growing Oregon Snow Peas and which one is growing regular peas? Um. The tall one is the Oregon Snow Peas. I started planting them in March, and this is all the taller the regular peas are? Rolling My Eyes. 

Purplexing Pea Plants

The tomato grow area is filled with plants as of today.  I have eight tomato plants and seven bell pepper plants in there. I have the peppers in the shaded area of the space since this is their first day outside. 

Bell Peppers, Tomatoes and Strawberries in wind/rain shelter Grow SpaceGrow space plants different angle

Tuesday, May 18, 2021

2021 Tomato Outdoor Grow Space Experiment


Last Year's 2020 Tomato Grow Space
Last year, I created a grow space for my tomatoes with PVC and while it did work, it had its issues, such as unstable roof when it rained really hard, not much inside space and, fully facing the south it got too hot too easily. Last fall, the strong winds from the east totally disassembled the poor structure. Another draw back is that I had dug holes to drop the 5-gallon buckets into, only to have gophers/moles dig right up to the base of the buckets, and when I watered, the buckets drained way too fast and didn't hold the water as I expected them to do.  This first photo is last year's attempt at a tomato space

So, this time, on the west side of the greenhouse, we are using the rafters of the greenhouse to anchor the top portion of the repurposed 1/2 inch PVC arches. (See arrow near top of photo below.)  I had used the PVC arches as part of the "Hoop Coop" that we originally built for the turkeys a whole lotta years ago. We had to tear down the coop this spring because of mold/mildew issues. We did salvage some portions, like the wire, PVC, the sliding door and the treated wood base.  In order to get more PVC to match up with the current arch, I tied a couple 10' long pieces of PVC so that they will also match the arch. (See last photo below for arching technique that I use.) It will take a few days in the sun/weather to get the PVC to hold this particular arch shape. Then we can use them for the tomato space. Otherwise, the three arches that we currently have will not be strong enough for the overall space (approx. 5' x 8.5'). 

This Year's Tomato Grow Space Project
The nice thing about half inch PVC is that it is relatively flexible but sturdy for these types of projects. (See arrows near the center of the photo above for examples.) It fits easily over the 5' ceramic dowels that we drove into the ground to use as support for the vertical PVC pieces. These dowels are also called Fiber Rod Posts.  

The tall wall of clear plastic that we currently have in installed is 60" tall and wide (5'x5'). I used PCV T-connectors on the two base corners so that the PVC would slip over the ceramic supports that are pounded several feet into the ground. These skinny fiber poles/dowels are way stronger than wood, they are a little flexible, and they rarely break. So when the North wind hits this "clear plastic wall" it will lean/sway a bit, but should hold up. We need the wall to hold up to at least 50 mph winds without falling apart. Then, in the fall, I can take this wall down and store it inside the greenhouse. This wall will get the majority of the strongest winds that whip in from the north side of our house and should mostly protect the arched roof/cover that faces the west. 
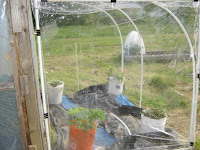
North Wind Clear Protection Wall
The stronger of the two of us pounded two-foot deep holes into the ground using a big round heavy iron rod (aka digging bar) so as to create enough space to drop the PVC arches into. To retain the holes' integrity, we bought some cheap 1" (inside diameter) PVC to use for support/braces that the half-inch PVC can easily slip inside. We slipped the 1" PVC with caps into the ground (caps in the ground) so that dirt would not fill back in from pounding them into the existing holes we had created. Wheee. This was probably the hardest part of the project. We will just need to be careful to keep them covered so that they don't fill in with dirt when we don't have the arches in place. (An empty "1-inch PVC hole" is in the photo below on the left side.) In other words, we want this to all be portable/removable. We want to be able to remove the majority of the space during the winter and early spring months so that the plants we do have growing in the greenhouse during that time gets to full benefit of the sun. 

PVC Arches going into the ground and one open hole.
We also took some left over 1" PVC lengths and attached those to the side of the rafter overhangs with clips (omega clips) to slip the arched half-inch PVC into. (See arrow near the top of the first photo above.) The next question is to figure out if we need to drill a hole and put a pin through the two pieces of PVC to keep the wind from pulling them out. We can experiment to see when we are closer to being done. I need to get the other arches in place first. 

Over the next few days, the tied arch of the two 10' long pieces will need to become established so that we can add them to this project. 

How I Arch half-inch PVC in 10-foot lengths.
The final thing I want to do is to make a little gate on the south side so that I have easy access into the area to water and care for the tomatoes. That will be similar to the north wall. Not as tall, and I will need for it to swing open and have the ability to fasten it closed for windy days. The gate will be part of a short wall to protect the plants from the winds from the South. 

I'll take more photos as we get closer to finishing. I hope to have it done by this weekend so that I can get my tomatoes out of the greenhouse and into the growing space.  PS - the strawberry buckets are there to hold the tarps in place on the ground to help kill grass/weeds until we decide what to put down on the ground. 

Update 5-23-21

Raining on the clear tarp
We now have all the arches attached. We needed to use pins to stop the arches from popping out at the top of the two supports towards the south side. The rest seem to be secure in place. The wind from the south would blow in and billow out the tarp, pulling out the PVC, causing the area to get wet because of the gap between the greenhouse overhang, and the edge of the tarp. But, the space is mostly done.  Still need to finish up the area on the southside, but the gate is in place and for now there is semi-clear plastic tarp about 4 feet tall on the south side.  There are not photos of the south gate in these. 
And it is dry on the tomatoes inside
Looking in from the south of the area, you can see the sun screen is in place up to about 3 feet on the west side with the clear plastic that is attached over it. That way the air can still flow through the fabric with less chance of mildew starting. I put four of my eight tomato plants in to start this going. Strawberries are still in there holding down the plastic on the ground. 
Can see inside from the North side
From the north, where we usually get the strongest winds, we can easily see inside so that we can quickly check on the growing conditions without having to go inside to figure it out. The south side will not have the super clear plastic. We can easily throw a shade onto the west side, as needed if the sun becomes too intense and on dry days, we can take the clear plastic off the top. We will have options based on weather condtions.  

View from the West side to the overhang
If you open up this last photo, you can see the rain is dripping from the greenhouse overhang onto the plastic and drizzling down the plastic tarp. For now, I think it will work.  But, time will give us more scenarios that we will need to think through and fix, or start over. 

If the space stays, I'll purchase some of those white clips designed for PVC so that it doesn't look so goofy with all the black binder clips. These binder clips are a lot less expensive and we use them for a lot of things. 

Latest Update 5-28-21

Cover Rolled Back
I have had some of the tomatoes in the grow area this past week and they seem fine.  I pulled out the hodge podge of tarps that I had on the ground and replaced them with a roll of vinyl weed block that is woven so that the water can easily drain through after I water the plants. It should also help to keep the ground warm for growing purposes. Today is the first day in a while without the really strong winds and  rain. 

Gate Closed (South)
Yesterday, the south access gate was blown apart by the winds.  Hammered the corners onto the PVC pipes better. Fingers crossed.  No other structural damage per se except that the wind did blow off a few of the black metal clips flipping them as far as eight feet away from the enclosure.  We think we found all of them. We had a few gusts of about 35mph yesterday, and the enclosure truly did hold up pretty well, except for the gate.  We are experimenting with a few bungee clips attached to a support rod, to try to keep the gate closed on windy days. Will probably need to do some more experiments with that since it does look very secure. But will keep working on finding a solution for the gate. 

South Access Gate is Open
The access gate, from the south side, is taller then the wind block on the west side.  The reason for the taller gate is more to keep rain and wind out as most of our wind comes at us from the SW. Hopefully, it is tall enough to accomplish that. 

Today, we rolled up the clear plastic on the top so that the plants can get "air" and unfettered sun. We did leave the wind block on the lower half of the west facing area because we have gotten a few 20 mph gusts today. 

All in all, floor space wise, there is more than 40 square feet.  We should have enough space to put in a couple more tomato buckets and several of our larger bell pepper plants. The plants along the backside in the photos below are the strawberries, holding the ground cover in place next to the green house. 
View from the West with wind block in place

The photo to the right is a different angle showing the wind block on the west side of the space, while the clear vinyl is rolled up to the top part of the PVC  arched pipes.
Different Angle Tomatoes on Weed Block Covering Tomato buckets placed on the new weed block The last two photos are photos of the ground cover in place, with tomato plants lined up getting some  sun and warmth in spite of the blustery winds. 

That appears to sum up our project thus far.